Tag Archives: garden

Cercospora Disease Treatment

Cercospora Disease Treatment

Cercospora is a fungal disease that can affect a wide range of plants, including fruits, vegetables, and ornamental plants. This disease is caused by various species of the fungal genus Cercospora. Cercospora disease treatment can be provided in several ways.

What is Cercospora?

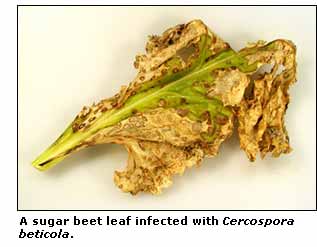
Cercospora is a fungal disease that affects plants. The disease causes leaf spots, which can be circular, oval, or irregularly shaped, and can range in color from yellow to brown. The fungus attacks the leaves of plants, and in severe cases, it can cause defoliation.

Where can Cercospora be found?

Cercospora can be found in many parts of the world. It is commonly found in tropical and subtropical regions, but it can also occur in temperate regions. The disease can affect a wide range of plants, including fruits, vegetables, and ornamental plants.

What causes Cercospora?

Cercospora is caused by various species of the fungal genus Cercospora. The fungus thrives in warm, moist environments, making it more prevalent in humid climates. The disease is often spread through wind and rain, as the spores are easily carried from plant to plant.

How do you identify Cercospora infection?

Cercospora infection can be identified by the appearance of leaf spots on the plant. These spots can be circular, oval, or irregularly shaped and can range in color from yellow to brown. In some cases, a yellow halo may appear around the spot. As the disease progresses, the spots may coalesce, causing the affected areas of the leaf to turn brown and die. In severe cases, the leaves may curl and become distorted, and the plant may experience defoliation.

Cercospora is caused by various species of the fungal genus Cercospora disease treatment can be handled using different methods


It is important to note that leaf spots can be caused by a variety of plant diseases, so it is essential to properly diagnose the issue. If you suspect that your plant is infected with Cercospora, it is recommended that you consult a local plant pathologist or extension service for proper identification and treatment options.

What does Cercospora do to plants?

Cercospora can cause significant damage to plants. The disease attacks the leaves of plants, causing leaf spots that can be unsightly and affect the plant’s ability to photosynthesize. In severe cases, Cercospora can cause defoliation, weakening the plant and making it more susceptible to other diseases.

How to treat Cercospora?

The best way to execute Cercospora treatment is to prevent its spread. This can be done by ensuring plants have proper spacing and adequate air circulation. Fungicides can also be used to treat Cercospora. According to a study by the University of Arkansas, fungicides containing azoxystrobin and pyraclostrobin were effective in controlling Cercospora on cucurbits (pumpkins, cucumbers, squash, etc.). Additionally, removing infected leaves and plant debris can help to reduce the spread of the disease.

Cercospora is a fungal disease that can affect a wide range of plants. The disease is caused by various species of the fungal genus Cercospora and can be found in many parts of the world. Cercospora attacks the leaves of plants, causing leaf spots and, in severe cases, defoliation. Cercospora disease treatment is handled through proper spacing, adequate air circulation, fungicides, and removing infected leaves and plant debris. By taking these steps, gardeners and farmers can reduce the spread of Cercospora and help to protect their crops.

Sources:

  • McGrath, M. T. (2017). Cercospora Leaf Spot: A Threat to Vegetable Crops. Cornell Vegetable Program. Retrieved from https://cvp.cce.cornell.edu/submission.php?id=449.

  • Yang, X., Wu, S., Wu, T., Lin, S., & Guo, L. (2017). Efficacy of Fungicides against Cercospora Leaf Spot on Cucurbits and Cercospora Leaf Blight on Soybeans. Plant Health Progress, 18(4), 224-228. doi:10.1094/PHP-04-17-0020-RS.

Broccoli Gardening

Broccoli Gardening

broccoli gardening Broccoli is a nutritious vegetable, high in dietary fibers, vitamins and minerals

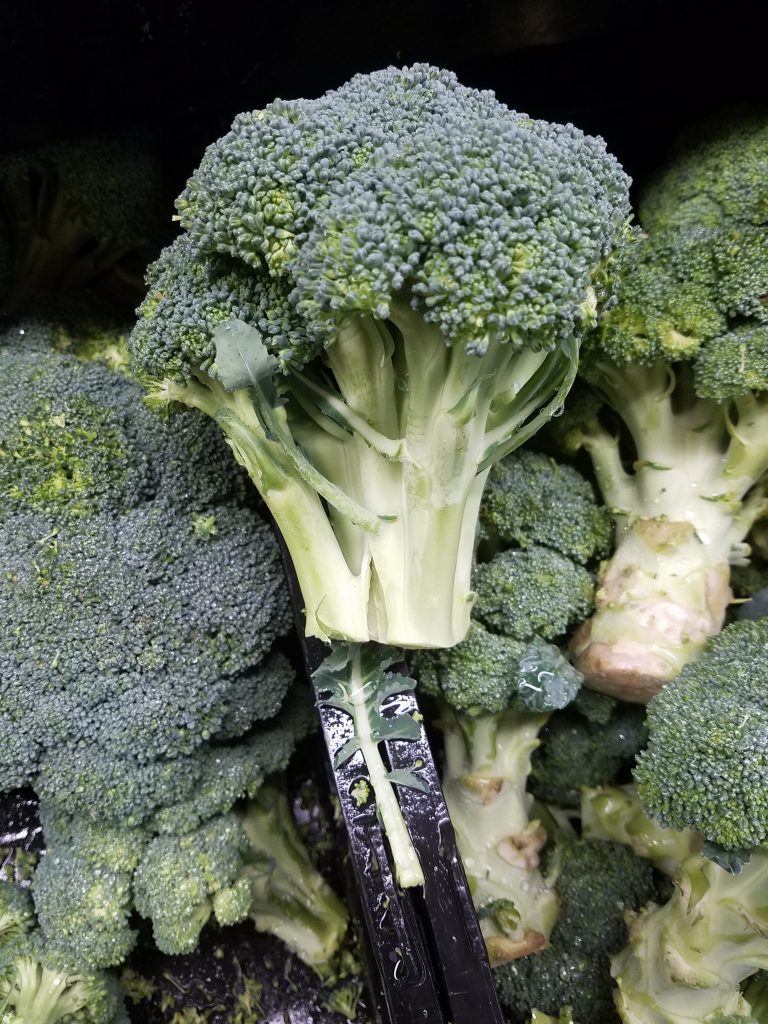
Broccoli, Brassica oleracea var. Italica, belongs to the plant species Brassica oleracea, that also includes several other common cultivars including cabbage, Brussels sprout, kale, cauliflower, and collard greens. The short, thick-stemmed plant from the Brassicaceae family is native to eastern Mediterranean and Asia Minor. It’s a herbaceous annual plant grown for its edible flower heads. If you want to attempt broccoli gardening, you should know the plant grows to about 24 to 36 inches high with thick, branching leathery leaves, and dense clusters of flower heads, usually green in color. It’s a cool season vegetable that takes between 60 to 150 days for the heads to come to harvest, depending on the variety.

Types & Varieties of Broccoli

Broccoli is a nutritious vegetable, high in dietary fibers, vitamins and minerals. It’s an excellent source of potassium, folic acid, and Vitamins A, B and K. Though most superstores only sell a few standard types, there is a wide range of broccolis to grow and harvest for home gardeners.

Common Varieties of Broccoli:

BelstarThis hybrid variety produces 6-inch blue green heads that take about 65 days to reach maturity. Once the main crown is picked, the variety is also known for producing a series of side shoots for further harvests.

Blue Wind F1 – This is an extra early maturing variety, producing large dense heads that take about 60 days to mature. The side shoot production is also commendable.

Di Cicco – It’s an Italian heirloom variety that produces its initial crowns in as little as 50 days, followed by side shoots. The plants mature at different rates, making it an excellent choice for home gardeners, giving a consistent supply of broccolis to the kitchen.

Purple Sprouting Broccoli – With purple flower heads instead of the typical green broccolis, the variety is much sweeter than others. It matures slower than others and is typically planted as a biennial to harvest in the following spring. 

Broccoli yields 4 to 6 pounds from a 10-foot row. Space individual plants 18 to 24 inches apart, with a 3-feet spacing between rows and plan about 2 to 4 plants per person.

Temperature and Timing for Growing Broccoli

Broccoli is a cool-season crop that’s typically planted in late winters or early spring for harvesting in early summer. For broccoli gardening a second crop can be planted in late summers for a fall harvest. Broccolis grow best when the temperatures are between 40°F to 70°F. High temperatures negatively impact the development of the heads, so gardeners aim to bring it to harvest before the temperatures soar.

Sun Exposure and Soil Requirements

Broccoli prefers full sun but if the temperatures are higher, partial shade may be better to prevent the plants from bolting.

Broccoli grow best in rich, fertile soil amended with plenty of organic matter and with a neutral soil pH.

How to Plant Broccoli

Broccoli gardening begins by starting the seeds indoors, 6 to 8 weeks before the last spring frost. It can also be started by direct sowing in the garden, 2 to 3 weeks before the last spring frost. Work the soil with 2 to 4 inches of aged compost in early spring before sowing the seeds. When planting outdoors, sow the seeds ½ inches deep in soil and 3 inches apart.

Water the soil and maintain it consistently moist throughout the germination phase. Once the seedlings emerge and grow to a height of 2 to 3 inches, thin them to maintain an 18 to 24-inch spacing between the plants.

If started indoors, transplants can go into the garden after hardening off, once they are 4 to 6 weeks old. Plant the transplants 18 to 24 inches apart, setting them slightly deeper in the planting holes than they were in the containers. Water the transplants well just after planting.

Fertilize the transplants with a low-nitrogen formula 3 weeks after planting them in the garden. Provide 1 to 1.5 inches of water each week, maintaining consistent moisture for best development. Always water at the base and avoid getting the developing heads wet. Mulch around the plants to suppress weeds.

Harvest

Towards the end of a successful broccoli growing season, you’ll have plenty of beautiful flower heads to harvest. Here’s how to pick them:

  • Harvest the buds as soon as they’re the size of a large fist, while they’re firm and dense, just before flowering.
  • If you wait too long to harvest, the buds open and the quality of the heads fall. You can still eat them but the texture is tougher.
  • Cut the heads from the base with 4 inches of stalk attached.
  • Let the plant grow after harvesting the main head and side shoots will develop. The new flower heads will be smaller in size than the main head but taste just as good.

Storing

Broccoli stays fresh in the refrigerator for up to 5 days. Store unwashed broccoli loosely wrapped in damp paper towels in the fridge and consume them within the next few days. If you want to store it for longer, you can freeze it after blanching and use it for up to one year. 

Pests and Diseases

Pests

  • Aphids suck the plants’ sap, leaving curling and discolored leaves. Hose them off the plants with a strong jet of water. If the plants are severely infested, insecticidal soap or neem oil can help.
  • Cabbage worms feed on broccoli leaves, causing serious damage to the plants. If handpicking does not help, in the case of serious infestations, treating with Bacillus thuringiensis is typically effective.
  • Flea beetles leave small holes in the foliage, killing off the seedlings and reducing the yield for mature plants. White sticky traps can help capture the insects. Insecticides are also helpful if used early in the season.

Diseases

  • Powdery mildew is a fungal disease that appears as white patches with purple blotching on leaf surfaces. The thick powdery layer coats the leaves, causing them to eventually drop off the plant. If the disease persists, it spreads to the stem and head. Plant resistant varieties, rotate crops, keep the foliage dry and avoid using excessive nitrogen fertilizers to prevent the problem.

Applying all the information you’ve learned from this article, you’re ready to begin a successful and rewarding broccoli growing season.

Carrot Gardening Information

Carrot Gardening Information for the Gardener

Carrots belong to the Apiaceae family, which also includes dill, cilantro, parsley, and celery. Though they’re biennial plants, carrot gardening typically cultivates the root as annuals, harvesting the long taproot at the end of the first season. If allowed to continue growing, they will flower and set seeds during the second year. Carrots produce a rosette of leaves above the ground and a long, fleshy taproot below the soil. Depending on the variety, the root can grow between 2 to 20 inches long, with a diameter of up to 2 inches. During the first year, the foliage typically reaches a height of around 12″. During the second year, when it flowers, the plant can grow as tall as 59 inches.

Types And Varieties

Besides being crunchy and tasty, carrots are nutritious vegetables. They are a good source of fibers, beta carotene, potassium, and antioxidants. Many different types of carrots exist, ranging in color, sizes, and shapes. Besides the orange-colored carrots you’re familiar with, yellow, white, red, and purple carrots also exist.

Common Varieties Of Carrots

  • Deep Purple Hybrid – This 7 to 8 inches long carrot reaches maturity in 75 to 80 days and comes in a deep purple color to make a bright addition to salads and dips. Though the unique hue runs all the way through the root, it will fade a bit when cooked, which is why it’s usually consumed raw. 
  • Little Fingers – Maturing earlier than others, this variety can be harvested in only 55 days. The miniature roots, up to 4 inches in length, feature an attractive orange color and are packed with sweetness.
  • Touchon – This is a sweet and tender heirloom variety that matures earlier than most others and is great for salads. The classic orange roots take about 65 days to mature, reaching a length of 6 inches.
  • Solar Yellow It’s a beautiful yellow heirloom carrot, sweet and crisp in flavor. They grow to about 7 inches in length, maturing in about 60 to 70 days from germination.

Carrots yield about 7 to 10 pounds for every 10-foot row. Grow about 30 plants for each person spacing them 1.5 to 2 inches apart in rows spaced at least 1 foot apart.

Temperature and Timing For Growing Carrots

Carrots are cool-season crops that are best grown in early spring and late fall. Day temperatures of 75°F and night temperatures of 55°F are best for their growth. You can sow the seeds outdoors 3 to 5 weeks before the last spring frost for a spring crop. Successive plantings can be continued until late spring for a continued harvest in the summers. For a fall crop, you can start planting 10 weeks before the first fall frost.

Sun Exposure And Soil Requirements

Though they can tolerate partial shade, carrots grow best when exposed to full sunlight. Make sure they get about 6 to 8 hours of direct sunlight each day.

Loose soil, sandy or loamy, is very important for carrot gardening to grow long straight roots. Work the soil before planting the seeds and remove any stones and debris from the area. Amend it with plenty of organic matter and compost.

How To Plant Carrots

Carrot gardening starts by sowing the seeds directly in the garden, 3 to 5 weeks before the last spring frost. Since they have long taproots, it’s recommended not to disturb them by transplanting. They are best planted in their permanent spot right from the start. Sow the seeds ¼ inch deep, spaced 1 to 2 inches apart in rows that are at least a foot apart. You can sow them closer together and thin them to 3 inches apart once they are around 4 inches tall. Cut off the top with scissors instead of pulling out the roots since they may damage the surrounding roots.

You’ll have to wait for around 2 to 3 weeks to see sprouting. Keep the soil moist during germination by sprinkling water frequently. Spread a thin layer of vermiculite over the soil surface to prevent it from forming a crust. Since the carrot seeds are very small, they’ll have a harder time sprouting if the soil forms a hard crust over them.

Provide about 1 inch of water per week during the first few weeks of development, increasing to about 2 inches per week as the roots approach maturity. Water the carrots deeply each time the soil dries out to a depth of 3 inches (you can check with your finger). Carrots follow the moisture into the soil, so if you water them deeply and less often instead of frequent, shallow watering, you’ll find long straight roots.

Keep the bed well weeded, but snip the weeds instead of pulling them so you don’t disturb the developing roots. Once the tops are 3 to 4 inches tall, you can fertilize the crop with a low-nitrogen fertilizer, such as 5-15-15. Excess nitrogen will promote green growth instead of favoring the roots.

Harvest

At the end of a successful carrot gardening season, you can expect a bright, flavorful harvest. Here’s how to harvest carrots:

  • Harvest the roots as soon as they reach the expected size. If you allow them to grow too big, they’ll start losing their flavor and will grow tougher.
  • Gently push away some dirt from the top of one of the carrots to check the size. Shey should be at least ½ an inch in diameter at the time of harvest. However, the exact size varies with the variety.
  • When growing carrots in spring, make sure you harvest them before the temperatures soar. High temperatures can turn the roots too fibrous.
  • For a fall harvest, let them stay in the ground, exposed to one or more frosts since it will enhance the flavors. If you want to keep them in the ground for harvesting later, spread several inches of mulch over them to keep them well protected.
  • When it’s time to harvest, loosen the earth around them and lift them gently out of the soil with your hands, taking care not to break the roots.

Storing

Cut off the excess foliage, leaving ½ inch attached to the top. Wash away the dirt and wrap it unpeeled in damp paper towels before keeping them in the refrigerator. Stored in this way, fresh carrots can last up to a month.

You can also keep them in the ground through the winters and dig them as needed unless the ground freezes over. However, if left in the ground all winter long, be sure to harvest them before spring when the tops resume new growth.

If the ground is expected to freeze during the winters, you can keep the carrots in the ground mulched with a 12 to 18-inch layer of shredded leaves, hay, or straw.

Pests And Diseases

Pests

  • Carrot rust fly is a common problem for carrot crops growing in temperate regions. The larvae dig through the roots eating the carrot and leaving unsightly holes on the surface. Install row covers at the time of planting before the adult fly has a chance to lay eggs around the plants.
  • Aphids are soft-bodied insects that can usually be spotted on the underside of leaves and are green or yellow in color. They secrete a sugary substance that promotes the growth of mold on plants. If the infestation is limited to a few leaves or shoots, you can prune them out to prevent spread to the surrounding shoots and plants. Insecticidal soaps can also be used to control spread.

Diseases

  • Alternaria blight is a fungal disease that appears as brown water-soaked lesions on leaves’ edges. Initially, the older leaves are affected, curling and eventually dying as a result. If the disease hits the crop at an early stage, roots are unable to reach maturity. Grow resistant varieties and avoid soaking the leaves when watering the plants to protect the plants from this disease.

With this article, you are ready to start a successful carrot growing season!

Tomatillo Gardening

Tomatillo Gardening

Tomatillo Gardening  is a warm season vegetable that’s planted outdoors once all dangers of frost have passed in spring,

Tomatillo (Physalis ixocarpa), or Mexican husk tomato, are members of the nightshade family, grown for their small, green or purple fruits. The fruits closely resemble unripe tomatoes in their appearance with a leafy husk that wraps the outside, hence the name. Tomatillos originated in Mexico and are a staple of Mexican cuisine to this day. They are consumed raw or added to soups, sauces, salsa, and jam. It’s a perennial plant in southern climates, usually grown as an annual vegetable that grows up to 3.3 feet tall. Tomatillo thrives in warm climates and are very sensitive to frost.

Types & Varieties of Tomatillo

Tomatillo is an excellent source of fiber. It’s rich in Vitamin C, Vitamin K and niacin. Several different varieties exist, with some differences in the size and flavor of the fruit. Some types give green or yellow colored fruits while some are purple.

Common varieties of Tomatillo:

  • Cisineros It’s a very productive variety that matures in 85 days and produces large green fruits, up to 2.5 inches in diameter. They have a sweet, fruity flavor and work great in salsa and sauces.
  • Pineapple – It’s a unique variety that produces loads of small, yellow fruits, about an inch in diameter. The fruits are green to begin with but turn yellow as they reach maturity, in about 75 days from planting. It’s sweet, pineapple flavor is where its name comes from.
  • Amarylla – This is an heirloom variety with sweet yellow fruits that reach maturity as the husks split open. The firm, small fruits are perfect for jams, and salsa.
  • Toma Verde – Maturing in 60 to 70 days, it takes little time to grow, producing abundant, large green fruits. The fruits are very sweet, and work great in sauces and salsa.  

Each plant produces 1 to 2 pounds of fruit so plan around 1 to 2 plants per person, spacing them 3 to 4 feet apart in rows with a 3-foot spacing between rows.

Temperature and Timing for growing Tomatillo

Tomatillo is a warm season vegetable that’s planted outdoors once all dangers of frost have passed in spring, and the temperatures are consistently above 50°F. You may start the seeds earlier indoors, 6 to 8 weeks before the last frost and transplant the seedlings once the frost has passed and the soil is warm. The vegetable plant thrives when temperatures are between 70°F and 80°F.  

Sun Exposure and Soil Requirements

Tomatillo requires a spot with full sun to thrive and produce abundant, healthy fruits. For best growth, it needs to get 8 or more hours of direct sunlight.

Well-drained, moderately fertile land is best for tomatillos, but since they’re hardy plants, they’ll also survive in low fertility.

How to Plant Tomatillo

Tomatillo gardening begins with planting the seeds indoors, 6 to 8 weeks before the last expected frost of spring. Staring the seeds indoors is especially important in regions where summers are shorter, since the plants will need at least two months to grow to maturity after being transplanted in the garden.

It’s important to know that you’ll need at least 2 tomatillo plants for pollination and fruit set. Since they are not self-fertilizing, individual plants will not be able to fertilize themselves. Plant the seeds in seedling trays filled with light potting soil and allow them to grow besides a sunny window before they’re ready to go in the garden.

Once the outdoor temperature stays consistently above 50°F, you can start hardening off the seedlings. Give plenty of time to adapt to the outdoor conditions before setting them in the prepared garden bed. Space them at least 3 to 4 feet apart since they have a bushy growth, with 18 to 24 inch spread.

Just like tomatoes, the seedlings are planted deeply since roots appear along the stems. Set some form of support, such as a trellis or a tomato cage to keep the plants off the ground. Mulch the soil with 2 to 3 inches of organic matter to keep weeds at bay and preserve soil moisture.

Offer about an inch of water each week. Since tomatillos are light feeders, they won’t need any fertilization if you planted them in organic soil amended with some compost to begin with.  

Harvest

Tomatillos take around 75 to 100 days to grow to maturity. Here’s how to harvest them.

  • Harvesting begins when the fruits fill out the husks and the papery husks start splitting open.
  • Sometimes, the husk won’t split open but will turn brown and leathery, this is also a sign that they’re ready to be picked.
  • Harvest them while they’re still firm. Don’t wait until the fruit turns pale yellow since they’ll be seedier and will lose their characteristic tanginess.
  • Remove the fruits by cutting the stem with sharp pruners. Avoid pulling the fruits as it may damage the plant.

Storing

If you plan on storing them, don’t remove the husk before refrigerating them. At room temperature, tomatillos will stay fresh for up to a week, while in the fridge, they can last for up to 3 weeks. Either place them loose or inside a paper bag. Don’t store them in plastic. You can also freeze whole or sliced tomatillos to save them for longer. Canning or preserving in the form of sauces or jam is another way to use your harvest through the rest of the year. 

Pests and Diseases

Pests

  • Aphids sometimes bother your tomatillos, sucking the sap from the plants. In small numbers, they aren’t too problematic but too many can cause stunted growth. You can hose them off with water or spray the plants with insecticidal soap.
  • Cucumber beetles, with yellow and black stripes on their back, live on the underside of the leaves, eating away the leaves and weakening the plants. Use floating row covers to protect newly planted seedlings. 
  • Potato beetles are orange-yellow, with three black lines on the back and are a common problem with tomatillo crops. If there are only a few of them, handpicking is enough to eliminate the pests. However, on a heavily infested crop, you may use chemical pesticides – but be careful when using pesticide while tomatillo gardening.

Diseases

  • Anthracnose is a fungal disease that attacks the fruits as it ripens. It begins as a small, sunken spot and grows into a large, black lesion. Eventually, the fruit will rot. The disease is often the result of very hot and humid conditions
  • Bacterial Leaf Spot damages the leaves and the fruits on the plant. It appears as translucent spots that grow bigger with a red center. The disease thrives in cooler climates.

Hopefully, this article will help you with your tomatillo gardening to grow the best tomatillos to feed your Mexican cravings – wish you a great gardening experience!

Cabbage Gardening

Cabbage Gardening

Cabbage, made up of several types of Brassica, is a leafy green, red, or white colored biennial plant grown as an annual for its dense multi-layered leaved heads. The leaves are commonly smooth in texture, but crinkle-leafed savoy cabbages are also grown (my favorites). They weigh generally from 1 to 5 lbs. however there are varieties that grow much larger for. Cabbage heads are picked during the first year of the plant’s life cycle. Plants intended for seed are grown into a second year.

Cabbage contain the following vitamins and minerals:

Thiamine (B1); Riboflavin (B2); Niacin (B3); B5; Vitamin B6; Folate; Vitamin C and Vitamin K

Calcium; Iron; Magnesium; Manganese; Phosphorus; Potassium; Sodium and Zinc

Cabbage History

It is descended from the wild cabbage and belongs to the brassicas, meaning it is closely related to broccoli, cauliflower and brussels sprouts. Cabbage was most likely domesticated somewhere in Europe before 1000 BC. Savoy cabbage was developed around the 16th century AD. World production of cabbage and other brassicas for 2017 was 71 million tons, with China accounting for 47% of the world total.

Types of Cabbage

Green

Early Golden Acre; a northern favorite that is ideal for smaller gardens. Round and compact, their heads average 2-3 pounds of sweet flavor – Ferry Morse

Early Jersey Wakefield; favorite with a distinctly sweet flavor – Burpee

Red

Salad Delight; an early maturing red cabbage with a 3 lb. head – Burpee

Red Express; very nice color and early maturity, compact habit 2 – 4 lb. heads – High Mowing Seeds

Savoy

Perfection Savoy; heirloom green savoy – Hudson Valley Seed Co

Purple Savoy; Produces small, 1-3 pound heads, a bit later than other varieties – Hudson Valley Seed Co

Cabbage has been selectively bred for head weight and characteristics such as frost hardiness, fast growth and storage ability. The appearance of the cabbage head has been given importance in selective breeding, with varieties being chosen for shape, color, firmness and other physical characteristics.

Commercial breeding objectives are now focused on increasing resistance to various insects and diseases and improving the nutritional content of cabbage. Unfortunately, this means in too many cases GMO. In my opinion it is better to put up with pests and disease management than to grow anything GMO, I may be wrong but allowing scientists and others to create something that may very well be a plant-based-Frankenstein is unsettling.

Where to Plant

Cabbage plants can handle full sun to light shade, so at least 5 to 6 hours of sun. Since cabbage plants are not setting flowers or fruit, they do not need a full day of sun. Cabbage gardening in warmer climates will require some shade during hot months, so the plants do not dry out. If you can, rotate where you plant. Try to avoid planting where cabbage as well as other brassicas have been planted for at least 2 years.

When to Plant

There are cabbage seedlings available at every garden center in spring, but for the best variety you will need to start yours from seed. You can start seeds indoors, about 6 to 10 weeks before your last expected frost date. Cabbages can handle a little frost, so you can transplant seedlings outdoors close to your last frost date as long as the soil is able to be worked and if a hard frost is expected you can cover the plants. Just make sure that any plants started and grown under lights are given the time to acclimate to the sun before being planted into the garden.


How to Plant

Space plants about 2 feet apart in rows with approximately the same spacing. Later plantings can be direct sown in the garden for fall harvest.

Plant Care

Plants perform best when grown in well-drained soil. Different varieties prefer different soil types, ranging from lighter sand to heavier clay, but all prefer fertile ground with a pH between 6.0 and 6.8. For optimal growth when cabbage gardening, there must be adequate levels of nitrogen in the soil, sufficient phosphorus and potassium. Temperatures between 39 and 75 °F prompt the best growth, and extended periods of higher or lower temperatures may result in plants “going nowhere”.

Cabbage likes even moisture to produce good heads. Mulch with compost, finely ground leaves, or finely ground bark to keep the soil cool and moist and to keep down weeds. Water regularly, applying 1 to 1.5 inches of water per week (including rain).

Fertilize plants with a 10-10-10 fertilizer after they begin to develop new leaves and when they start forming heads.

Pests

Cabbage worms and cabbage loopers are the main pest threats. They will munch holes throughout the leaves. Their coloring allows them to blend in with the cabbage, but they can be handpicked easily if you can see them. If you see small white moths around your plants, try and kill them. Check under cabbage leaves for small white (extremely small) nodes – these are the cabbage moth eggs. Crush them!! If you see wasps flying around your cabbages – leave them be, they are hunting the cabbage moth larvae.

Slugs will also attack your cabbages as will cutworms. Spread diatomaceous earth around the plants base. The diatomaceous earth will kill the insects but will not harm the plant and to top that, it is organic.

Root-knot nematodes and cabbage maggots attack the plant below soil level and produce stunted and wilted plants with yellow leaves. Predatory nematodes are a good organic solution to these pests.

Rabbits can also become a problem. If you have rabbits around, fence or net your cabbage beds.

Diseases

One of the most common bacterial diseases to affect cabbage is black rot which causes lesions that start at the leaf margins and wilting of plants.

Clubroot, caused by the Plasmodiophora brassicae, results in swollen, club-like roots. If you have soil PH below 6.0 consider raising it with lime to 6.8 – 7.0, by doing so you may avoid the issues with clubroot.

Downy mildew produces pale leaves with white, brownish or olive mildew on the lower leaf surfaces.

Harvesting

For cabbage that head’s up check for “ripeness” by squeezing it. A head that looks solid and ready may still be flimsy and loose leafed on the inside. When it feels firm, cut the head from the base of the plant. I do let cabbages ready to harvest stay in the garden if I am backed up on work but ff a head cracks, cut it right away. When cabbage gardening is done and cabbages are harvested, remove the remainder of the plant. cabbage gardening lends itself to double cropping with other plants. After you clean up the bed try planting turnips, beets or spinach for extra crop. Heads will keep for several weeks in the refrigerator.

Leek Gardening

Leek

What is a Leek

The leek (allium porrum), a mild flavored member of the onion family, is a hardy biennial grown as an annual in the vegetable garden. However; unlike onions and shallots, leeks do not bulb, they are straight stalk plants. They are grown for their thick, juicy, mild flavored stems. The edible part being the lower stem.
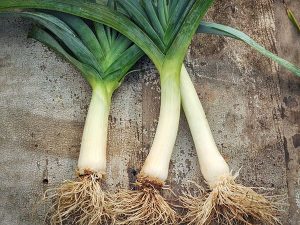
The leek is known as the gourmet's onion because of their mild flavorIf left in the garden, and if they survive winter weather, they will flower in year two and go to seed, as does parsley.

The top growth of leeks (the leaves), called the flag, are thick and strap like and are colored green to dark blue-green. The top growth does not die back as the plant matures.

Leeks contain the following vitamins and minerals:

Vitamins – Vitamin A, Thiamine (B1), Riboflavin (B2), Niacin (B3), Pantothenic acid (B5), Vitamin B6, Folate (B9), Vitamin C, Vitamin E, Vitamin K

Minerals – Calcium, Iron, Magnesium, Manganese, Phosphorus, Potassium

Leeks can require a long growing season—up to 170 days. They grow best in cool, mild weather.

They require little to no attention and are generally pest-free. In the kitchen, they can be substituted for onions. Leeks can be chopped and frozen for later use.

Types of Leeks

There are two types of leeks: short-season (non-hardy)and long-season (hardy).

Short-season leeks, also known as summer leeks, have thin stems. They mature in about 60 – 90 days and are harvested during the summer and early fall. They can be harvested and used like scallions when young. Summer leeks are not winter hardy and do not store as well as long-season leeks. Good varieties of summer leeks are:

Alto Leek early summer – High Mowing Seeds
King Richard Leek – High Mowing Seeds
Chinook Leek – Territorial Seed Company

Long-season leeks, also known as winter leeks, have thick, cylindrical stems. They take about 100 – 170 days to reach harvest. Long-season leeks are harvested late summer through the winter. They store well either inground or in cold damp sand. Good varieties of winter leeks are:

Bandit Leek – High Mowing Seeds
Tadorna Leek – High Mowing Seeds
American Flag – Ferry Morse

Where to plant

First, if you can, you should rotate the location of where you grow your vegetables – and that also includes leeks.  Try to move them to a new bed to avoid sections where they, onions or garlic have grown in the past year. This helps avoid the pests and diseases that can cause problems or ruin the crop.

Leeks like full sun, however, they do tolerate partial shade. Plant in well-drained soil rich organic soil with a pH of 6.0 to 6.8.

When to plant

Winter leeks take up to four (4) months to mature, if you live above zone 7, you should sow your winter leek seeds indoors in early spring. Start the seeds indoors about 2 – 3 months before the last expected spring frost – check the Plant Hardiness Zone Map

Transplant seedlings into the garden as early as 1 to 2 weeks before the last expected spring frost. Leeks should be in the garden no later than early summer for autumn harvest.  They will survive light frosts even when young — and heavy frosts in the fall.

If you live in planting zone 7 and warmer, you can plant winter leeks directly into the garden about the time of the last expected spring frost.

Summer leeks can be sown directly into the garden about the time of last spring frost dates.

Unused seeds can be kept up to 3 years.


How to Plant

First, mark your rows and remove the top 6 inches of soil in each row to create trenches. Space leek transplants 6 inches apart when planting. They grow best in temperatures between 55° and 75°F. Growth will be slowed by hot weather. Planting beds should have well-aged manure and compost.
Sow leek seeds ½ inch deep. They typically germinate in 10 to 14 days at 70°. When the seedlings reach about 8 inches, thin to 4 to 6 inches apart. Rows should be spaced 12 to 16 inches apart. Stagger the plants in each row so they are not uniform, this will allow the plants more room to grow.
As the plants grow you will need to use the removed soil to back-fill around the stems (you may fill in 2 -4 times during the growing season). This will blanch the lower stems that get covered. Blanched stems will be white and tender. Another way to blanch stems and avoid playing with dirt is to use leaves and grass clippings. I tried this in 2020 and it worked fine – it also kept the plants dirt free.

Plant Care

If you start your leeks indoors keep the tops trimmed  to about 4 inches tall to encourage stocky stem growth. When the weather is good, transplant into the garden.

Keep the soil around leeks evenly moist; water when the surface becomes just dry. Feed plants with compost tea or worm tea every four weeks during the growing season. If using normal fertilizing methods, you should spread 5-10-5 fertilizer every 3 to 4 weeks at a rate of 5 ounces of fertilizer per 10 feet of row.

Soil that tumbles into leaf folds can wind up trapped between skin layers in the stem. To keep this from happening you can slip a section of paper tube, such as from toilet tissue or paper towels, over the plants while they are still young as early as planting time. The tube will rot over the growing season but will help prevent soil from getting into leaf bases during early growth.

The closer together you plant leeks, the smaller they will be. Commercial growers usually place them about 6-8″ apart and don’t thin them. A good technique for home gardeners is to plant them just 2-3″ apart and achieve proper spacing by harvesting leeks as you need them. These young leeks are a good substitute for green onions in the kitchen.

After planting, mulch the bed with straw (I hate Straw) or other organic material (try shredded paper) to help soil retain moisture. Water plants as needed until they are established. Plants require an inch of water a week, either through rainfall or irrigation. Inconsistent moisture may cause tough stems.

Pests

On young plants, slugs can be devastating. Gather them at night, set traps, or use biological control.

Diseases

If there is a lot of rain in winter or early spring, leaf rot can set in. Rot shows as white spots on leaf tips that eventually shrivel. At this point there is not much you can do except pull the rotted plants and thin the planting to increase air circulation.


In summer orange pustules on leaves indicate leek rust, which is worse in wet growing seasons. Remove affected foliage; later maturing foliage will be healthy

Harvesting

You can pull leeks any time. Typically, you want them at least 1 inch or larger in diameter, but you can dig young ones to eat like green onions / scallions. Leeks have large root systems so use a hand fork or garden fork to loosen the soil before lifting the plants. A 10-foot row can yield up to 15 to 20 mature plants.

In colder areas, extend the harvest season by mulching deeply around plants (up to 1 foot deep). You can continue harvesting leeks but when a hard freeze is expected dig them up.

In zones 7 and warmer, you should be able to harvest leeks all winter long.

Storing

Initially, when harvesting leeks, shake and brush off as much soil as possible then rinse the plant thoroughly. To freeze leeks, wash, slice, and blanch for 1 minute in boiling water. Drain, drip dry, and toss into plastic freezer bags.

Store leeks wrapped in a damp paper towel in a perforated plastic bag in the refrigerator for 7 to 10 days. Smaller leeks store better than larger leeks. Trim the roots and wash the leaves and stem before refrigerating.

For longer storage in coldest zones, dig leeks with roots attached. Cut leaves back until just an inch of green remains on each leaf. Place stems in a box (root side down) and pack with sawdust, clean sand, or vermiculite. Keep the packing moist and store in a cool place. Stems will keep up to 8 weeks