All posts by traderscreek

Bean Gardening Information

Beans

Both string/wax beans like cucumbers, always have a “reserved section” in the vegetable garden. They are relatively easy to grow, if handled right are big producers and beans are able to be eaten fresh, added to recipes, cooked as stand-alone main or side dishes. They can be blanched and frozen and they even store well as pickles (dilly beans). Beans figure prominently in my ultimate quest to grow enough food –GMO and pesticide free – to provide a year round supply.

This year I planted 3 seven foot rows of bush beans for 2015. I chose 1 type to plant. It was a bush bean from Burpee called Garden Bean Stringless Green Pod. The Advertising for these beans states:Bush_Beans
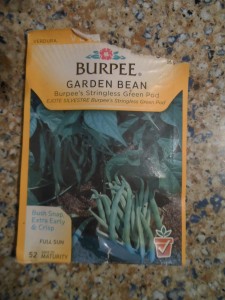
Exceptional flavor.

HEIRLOOM. This Burpee bred bean is entirely stringless; it’s brittle, meaty, juicy and has exceptional flavor. Plant yields are early and extremely high; pods are round, about 6″ long and slightly curved. Plants are entirely self supporting. A 2 oz. seed pack will plant a 20 ft. row. Our seed is not treated.

Growth Habit: Bush
Days to Maturity: 50 days
Sun: Full Sun
Height: 12-18 inches
Spread: 10 inches
Thinning: 6 inches
Sowing Method: Direct Sow
Fruit Size: 6 inches

They are spot on when describing flavor and the fact the pods are stringless. I will say all seeds germinated, the plants lasted all season, although I should have cropped and did a second planting in August.

We had a really bad season in 2015, weather and animal damage was the “order of the day”. First up was some animal was making short work of any bean plant near the edge of the garden. Leaves were eaten off and many times even the plant was chewed down. My guess is a rabbit since they are very common although my neighbor harbors a woodchuck and gray squirrels are all over. Anyway, the outer edge plants suffered all year.

June 2015 weather in the Northeast was cold. None of my plants really did anything during the month except survive. When July rolled around and everything warmed up and the beans took off.
By Mid-July we grew enough for weekly side dishes. That continued through frost – mid-October. The weight count harvested on the 21 feet was 13 lbs. Nothing was canned or frozen. A 13 lb. harvest is lower what my books say is the average harvest (14 lbs.) for the amount planted, it is very low based on past experience. There are prior years where a 16-foot row of pole beans would provide for 2 side dishes each week and enough to can/freeze for weekly side dishes from November 1 – April 30 of the next year.

Next year I am going back to pole beans. I am going to try Fortex (a pole snap bean) produced and sold by Burpee.

Bean Types:

Snap beans – the most popular garden beans — include bush and pole varieties, which vary in shape, size, and color. Tender filet beans are a type of green snap bean with stringless, slender, delicate pods. They are grown just like other snap beans.

Shell beans – grow like snap beans, but the immature pods stay tender for only a few days as the plants hurry to produce mature seeds. They are very easy to dry.

Scarlet runner beans – produce clusters of red blossoms that attract hummingbirds and bumblebees. You can eat the young pods like snap beans, or let the pods dry and harvest the mature beans.

Lima beans – stand up to humid heat and heavy insect pressure, which makes them a fine bean for warm climates.

Planting Beans

Beans do best in a soil with a PH of 6.0 – 7.5. Beans benefit from fertile soil. Before planting add some well-rotted compost, peat moss or fresh top soil into the garden bed. Beans make most of the nitrogen they need. When growing beans in a new garden site, inoculating seeds with nitrogen-fixing bacteria before planting can help kick-start this process.

For bush beans, plant seedlings 6” apart and keep the rows about 2 feet wide. Pole beans should be plant at about 10” apart in rows at least 2 – 3 feet wide. Pole beans need poles to grow on. I place posts 6 feet high about 2 feet apart and use wide garden netting for the plants to climb up. Mature pole beans are heavy and can bring down your entire row. Make sure the poles are firmly anchored and strong. It is not a bad idea to use cross beams to create a strong “fence row”.

Bean seeds germinate best when soil temperatures range between 60 and 70 degrees Fahrenheit. In spring, sow seeds in fertile, well-worked soil starting on or after your last frost date. Some of the problems you may encounter are:

• Many times the seeds will just sit until the weather is just right – that early in spring the soil may not get to the optimum temperature.
• If the soil is too wet, the seeds may rot or the young plants may “damp-off” and die.
• If you are “blessed” with squirrels like I am, they will dig up the seeds and eat them.

If you are planting seeds directly into the garden, plant them about 1 ½” deep.

I like to start the seeds about 3 weeks before the last expected frost inside the house under grow lights. Keep the seeds warm. They should sprout in about 2 weeks. Empty the pots of any seeds that do not sprout, pull the seed and replant the pot with a new seed. Plants that come up deformed should just be discarded and the pot should be replanted with a new seed. The previous 2 comments are more for me, way too many times I attempt to “doctor” the plants – it rarely works and the effort is not worth it. I plant the young plants about 2 weeks after the last expected frost – weather permitting, which means if the seven-day forecast is for decent, dry weather.

I let pole beans grow the full season. For bush beans, you should make additional plantings at least 1 more time during the season. Again, because I do not grow 50+ feet of row, I start seeds in pots about 3 weeks before I replant. When the seedlings are big enough, pull out the older plants, throw down some 10-10-10 fertilizer, a touch of lime (if necessary), add a little compost and replant. You will be happy you did. Even though you are giving up about 2 weeks of fresh beans, the new plants will end up producing more than the older plants would have.

Harvesting and Storing Beans

First thing is first, according to James Underwood Crockett, bush beans should produce roughly ½ lb. per foot per planting (so 2 plantings will give you 1 lb. for each foot.) Pole beans are different; you should look for a minimum of 1 lb. per foot for the season up to 2 lbs. If you are lucky shell beans will produce about ¾ lb. to 1 lb. per foot.

Harvest snap beans when they are young and tender. If you let the bean pods mature the plant may stop producing or will produce much less. The plants can be damaged or worse if you are not careful when harvesting. I like to use scissors or I will hold the plant where it connects to the bean pod. Most bush beans will produce a second or third crop of beans after the first one is picked. Harvest pole beans at least twice a week to keep the plants productive. The mature beans of all snap bean varieties usually make good soup beans.

Allow shell beans to stay on the plants until the pods turn tan and the beans inside show good color and a hard, glossy surface. If damp weather sets in just when your beans should be drying, pull up the plants and hang them in a dry place until they are dry enough to shell and sort. Allow your shelled beans to dry at room temperature for two weeks before storing them in airtight containers. If you think insects might be present in your stored beans, keep them in the freezer.

Saving Bean Seeds

To save dry beans for replanting, select the largest, most perfect seeds from your stored beans. With snap beans, it is best to harvest beans at the season’s end since it will not interfere with the food harvest. Be patient, because snap bean varieties that have been bred to stay tender for a long time are often slow to develop mature seeds. Under good conditions, bean seeds will store for at least three years.

Preventing Bean Pests and Diseases

Mexican bean beetles sporting black spots often lay clusters of yellow eggs on leaves, which hatch into yellow larvae that rasp tissues from leaves. Handpick this pest in all life stages, and try spraying neem oil to control light infestations.

In upstate New York, Japanese beetles are the devil to beans. The best organic method to fight them is to use Japanese beetle traps. If you use pesticides, you will end up dealing with: when you can theoretically harvest and the damage done to non-target insects (bees).

Beans grown in sites that recently supported grasses are often sabotaged by night-feeding cutworms. Another reason I like to start indoors and plant 3 week old plants.

Several fungal and bacterial diseases cause dark spots and patches to form on bean leaves. To keep from spreading diseases among plants, avoid working in your bean patch when foliage is wet.

Bean Growing Tips

Extend your harvest of bush snap beans by planting them two or three times, with each sowing three weeks apart. In warm climates, make a sowing in late summer, about 10 weeks before your first fall frost is expected.

Grow more beans in less space by growing pole varieties, which produce more per square foot by making good use of vertical growing space.
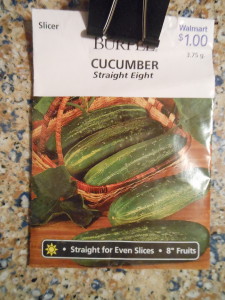
Cucumber Gardening Information

Cucumber:

Cucumbers have always been a staple in my gardens. They are relatively easy to grow, if handled right are big producers and cucumbers are able to be eaten fresh, added to recipes and they store well as pickles.

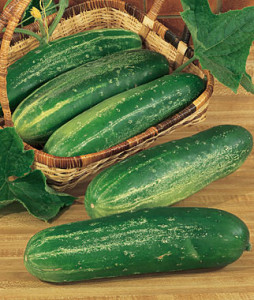
This year I planted 10 feet of cucumbers. I chose 1 type to plant. It was a “slicing” cucumber. I chose Burpee’s Straight Eight. The Advertising for these cucumbers states:

A cucumber superstar, this classic has excellent flavor and is widely adapted.
This heirloom, All-America Selections winner is a cuke for all burpee_straight_eight_Cucumberseasons. Pick when 8″ long for top flavor. For perfect cukes, grow them on a fence or our space-saving Trellis Netting. Sow seeds 6″ apart in rows, or plant 5 or 6 seeds in groups (hills) 4 to 5′ apart.
Sun: Full Sun
Height: 6-8 inches
Spread: 36 inches
Days to Maturity: 58 days
Sowing Method: Direct Sow
Fruit Size: 6-8 inches

I planted 10 feet of straight eights – 4 mounds of 2 plants each. I found the Burpee straight eight to be a very good cucumber. Fantastic taste and prolific. One issue we had with them is if we let them go a week extra, we would need to scrape out the seeds since they started to take over the cucumber.

We started the cucumbers in mid-May in the green house in large seed pots filled with starter soil. They were not planted until the second week of June when the plants already had 3 sets of leaves. I set up a plastic wide-mesh fence so the plants could climb. As far as fertilizer, we used miracle grow 10-10-10 – 3 times during the season. We had no issues with pests and in-fact honey bees were common the entire summer around the “cukes”, something that made me happy since for the last five or so years seeing honey bees in any quantity has become very rare. I try not to use chemicals and in late September we lost all the cucumbers to powdery-mildew. So, word to the wise – beware.

We ended up picking 32lbs. over the season. Almost all eaten or given to the “kids” In accordance with my garden book written by James Underwood Crockett – that is a decent average for the amount I planted.

Some Cucumber Info:

Description

Even though long, dark green, smooth-skinned garden cucumbers are familiar vegetables in the produce sections of most groceries, cucumbers come in a wide variety of colors, sizes, shapes and textures. You’ll find white, yellow, and even orange-colored cucumbers, and they may be short, slightly oval, or even round in shape. Their skins can be smooth and thin, or thick and rough. In a technical sense, cucumbers are actually fruits, not vegetables.
All cucumbers belong to the botanical plant family called Curcubitaceae. This broad family of plants includes melons and squashes.

Burpee_CucumbersWhile there are literally hundreds of different varieties of cucumbers, virtually all can be divided into two basic types: slicing and pickling. Slicing cucumbers include all varieties that are cultivated for consumption in fresh form. Pickling cucumbers include all varieties that are cultivated not for consumption in fresh form, but for processing into pickles.

Growing Cucumbers

Cucumbers are fairly easy to grow if you take care of a few things:
1. They like a fairly neutral soil.
2. They are heavy feeders so when planting make sure to add either: compost, well rotted manure, some grass clippings or anything that will help provide nourishment for the plants.
3. They need water so make sure to provide plenty and if you keep the water off the leaves all the better to avoid powdery-mildew.
4. You can double crop cucumbers. Start the second sowing in late June in pots. By late July pick all cucumbers from 1st crop, pull out plants, add some 10-10-10 or 5-10-10 fertilizer and plant the young plants. This should give you a good crop by Mid-August and depending on your average frost dates, you should have cucumbers “till-the end”.

History

Cucumber plants naturally thrive in both temperate and tropical environments, and generally require temperatures between 60-90°F. For this reason, they are native to many regions of the world. In evolutionary terms, the first cucumbers were likely to have originated in Western Asia (and perhaps more specifically in India) or parts of the Middle East. It was not until the time of the European colonists that cucumbers finally appeared in North America in the 1500’s.

Northern Mockingbird Information

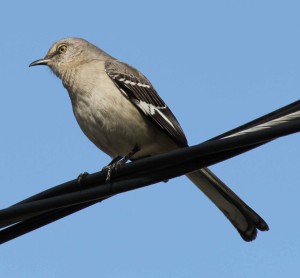
Northern Mockingbirdmockingbird

Recently, on a visit to Long Island, NY, I sat in a kitchen listening to what seemed like a flock of different song birds singing away right outside a window in a holly bush. It was no surprise to walk outside and see a Northern Mockingbird sitting on the top of the bush switching its tune over and over.

Description:

The northern mockingbird is a medium-sized songbird, a bit more slender than a thrush with a longer tail. Mockingbirds have small heads, a long, thin dark bill with a downward curve at the tip and long legs. Their wings are short, rounded, and broad, making the tail seem particularly long in flight. Both males and females look alike.

The Mockingbird is overall gray-brown, paler on the breast and belly. As the picture indicates, mockingbirds have two white wingbars on each wing. A white patch in each wing is often visible on perched birds, and in flight these become large white flashes. The white outer tail feathers are clear when the birds are in flight.

Mockingbirds are approximately 8.3” – 10.2” long with a wingspan of 12.2” – 13.8”. They weigh about 1.6 – 2 oz. As a comparison, northern mockingbirds are slightly smaller than a common grackle

Habitat:

The northern mockingbird can be found in towns, suburbs, backyards, parks, forest edges, and open land at low elevations. They usually reside in fields and forest edges, usually seen in farmlands, roadsides, city parks, suburban areas, and open grassy areas with thickets and brushy deserts

Food:

The northern mockingbird is an omnivore. They eat mainly insects in summer but switch to eating mostly fruit in fall and winter. Among their animal prey are beetles, earthworms, moths, butterflies, ants, bees, wasps, grasshoppers, and small lizards. They eat a wide variety of berries and fruits. They’ve been seen drinking sap from the cuts on recently pruned trees.

Territory:

The mockingbirds’ breeding range is from Maritime provinces of Canada westwards to British Columbia, practically the entire Continental United States, and the majority of Mexico to eastern Oaxaca and Veracruz. The mockingbird is generally a year-round resident of its range, but the birds that live in the northern portion of its range have been noted further south during the winter season. The bird can most frequently be found in the Southern United States


Read more about animals at: www.grizzlyrun.com

Stuffed Roasted Peppers Recipe

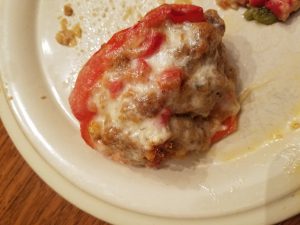
Stuffed Roasted Peppers

What I like about this Stuffed Roasted Peppers recipe is that you can assemble and then put into the freezer for stuffed roasted peppersfuture use. We grow so many peppers that we need to always come up with new recipes. Another great feature is, other than cheese, this is a pure vegetarian meal – with the cost of meat that is great. If you have a garden, as we do, this is a great chance to make a meal from your hard work. You will also know how the vegetables were grown!! Try using red and yellow peppers for some extra color.
Ingredients

2 tablespoons olive oil, plus 2 tablespoons
4 bell peppers, halved lengthwise – remove insides
1 pint tomatoes chopped. Remove excess seeds if necessary
1 medium onion, diced
1 cup packed fresh basil leaves – chopped
3 garlic cloves, finely chopped
1/4 teaspoon crushed red pepper flakes
1 cup grated mozzarella
Salt and freshly ground black pepper

Directions

Preheat oven to 425 degrees F.

Lightly oil a large shallow baking pan with 2 tablespoons olive oil.

Arrange peppers, cut sides up, in baking pan, and lightly oil the cut edges.

In a bowl, toss the tomatoes, onion, basil, garlic, 2 tablespoons oil, crushed red pepper flakes, mozzarella – salt and pepper to taste.

Divide mixture among peppers and roast in upper third of oven until peppers are tender, about 20 minutes.

If you want to change up the stuffed roasted peppers and add meat. Chicken, lamb, beef all work well, then just

Look at other pepper recipes https://traderscreek.com/recipes/recipe-index/

Try wild life recipes

Apple Dumplings

Apple dumplings made based on this recipe makes a great desertApple Dumplings

Every year we go to a local orchard and pick apples. This year we picked a ½ bushel of Mac’s. Other than eating an apple every day and making apple sauce or an apple pie, we are always looking for new and easy recipes. While watching Food Network we watched Trisha Yearwood make this apple dumplings recipe. Right after the show we went into the kitchen and tried it. I give this an A+

Ingredients

2 apples
1 cup sugar
1/2 cup (1 stick) butter
1/4 teaspoon vanilla extract
8 Pillsbury Grands biscuits
4 teaspoons ground cinnamon

Directions

In a medium saucepan, mix 1 cup water, 3/4 cup of the sugar, the butter and vanilla. Bring the sugar mixture to a boil over medium heat.

Preheat your oven to 375 degrees F.

Peel and slice the apples vertically into 8 slices each.

Separate each biscuit into 2 layers. Wrap a biscuit layer around a slice of apple, stretching the biscuit slightly to overlap, and seal on the bottom. Place the wrapped slices, sealed-side down, in a casserole dish – do not use a dish that is too small you do not want the liquid to boil the dumplings but rather you want the liquid to reduce down into a thick syrup.

Pour the hot sugar mixture over the apple slices. Mix the remaining 1/4 cup sugar with the cinnamon and sprinkle the mixture over the tops of the wrapped apples. Bake until golden brown, 35 minutes.

Serve this freshly cooked, warm and with a scoop of vanilla ice cream. Make sure to take a tablespoon of the syrup and drizzle over the apple dumplings!!

I found this apple dumplings recipe while watching Trisha Yearwood on Food Network but made a few modifications. This Apple dumplings recipe is an A+. Give it a try.

Back to recipes

Broccoli Cheese Soup Recipe

Broccoli Cheese Soup

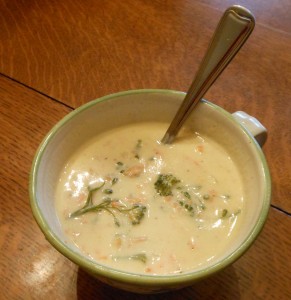
My wife went out to the garden and picked broccoli from the garden. She did an internet search and came up with a recipe for broccoli cheese soup. She did some tweaking and ended up with what I consider an A+ soup recipe.broccoli cheese soup made with a good sharp cheddar cheese. A meatless dish for everyone

Ingredients

3 tbsp. unsalted butter
1 medium chopped onion
¼ cup melted butter
¼ cup flour
1 quart of half-and-half cream
1 quart chicken stock
1 lb. fresh broccoli (about 2 cups)
2 cups carrot, grated
1/2 tsp. nutmeg
1 lb. grated sharp cheddar cheese
Salt and pepper to taste

Directions

In a large skillet, sauté the onion in 2 tablespoons of unsalted butter until the onion is translucent then set aside.

In a large pot make a rue by whisking together the ½ cup (1 stick) melted butter and flour over medium heat for about 3-4 minutes. Slowly stir in the half and half and chicken stock. Let it simmer for about 20 minutes.

Add the broccoli, carrots, and onions. Let them simmer on medium low for about 25 minutes until the broccoli and carrots are tender. Add nutmeg, salt and pepper and sharp cheddar cheese. Let the cheese melt and then serve.

You can jazz up this broccoli cheese soup by first roasting the broccoli in the oven to given a slightly hearty taste. However you make it, you will end up with a really hearty soup. This can be served as a main entrée for dinner or as a “warmer-upper” on a cold winter day.

A nice hot thermos of broccoli cheese soup while ice fishing or lunch when out and about in the woods will provide a full stomach and energy.

Check our wild life recipes